Download Mozilla Firefox 9.1

The Latest Mozilla firefox
Firefox 9.1 browser was released by Mozilla.com. Firefox is the most popular browser from the other browser.  If your system still use the old version, you can download the latest version of Firefox browser.  In the latest version firefox is more stable and make improve and secure internet connection.

You can download Mozilla firefox 9.1 at this link bellow :

Download Ultimate Windows Tweaker | TweakUI and optimizing Windows 7 & Vista

If you are like to tweak and change your windows operating system manually, you can get the trick and tutorial to tweak UI windows Operating system specially Windows vista or windows 7 with browsing in the internet. There are many web and blog that give you tips and tricks to optimize, tweak your windows 7 operating system. But if you tired to try that tips and tricks, you can doing quick tweak UI, optimize windows vista and windows7 by easily with freesoftware Ultimate Windows Tweaker from TheWindowsClub. With judicious tweaking, it can make your system faster, more stable, and more secure with just a few mouse clicks.

Ultimate windows tweaker

With this ultimate windows tweak, you can customize start menu, customize windows explorer, customize taskbar appearance, see system information of computer, setting User Account and UAC, System performance and many more. That’s all can be done with instantly. Besides that above, this is features of UWT :
  • Revamped UI similar to Windows 7/Vista UI controls
  • Improved: Optimize services, enable/disable services and start/stop as well instantly
  • Version with build no
  • System Rating
  • Computer description
  • Disable Aero shake
  • Disable Aero Snap
  • Enable Jump lits and nos of jump list items
  • Sorted Startmenu with all Windows 7 items
  • Bing Search replaced Live Search in Custom Start Search
  • Use large icons on Taskbar
  • Disable Aero Peek preview
  • Group when Taskbar full is added
  • Welcome screen text and buttons’ effects
  • Set custom background on Welcome screen (OEM Background)
  • Trackbars’ Tooltip shows actual value in miliseconds
  • Improved “Menu action”
  • Improved “Enable support for 4GB of RAM on 32bit Windows”
  • Disable Windows Security Center service
  • Disable System Restore settings
  • Disable Change Color and Appearance
  • Disable to skip starting programs by pressing Shift key
  • Reset IE to factory default button added
  • Disable Windows Startup sound
  • Disable pagefile (Virtual Memory)
  • Enable Large System cache
  • Delete pagefile during shutdown process
If you want to get and try this software, you can download Ultimate Windows Tweaker | UWT (138 kb) at this link bellow :

Freedownload Advanced SystemCare 4.Pro

Advanced SystemCare is PC maintenance tool from Iobit. It’s full utilities to fix problems, improve performance. This program make user to easily maintenance their computer with one click. The program is split into four core sections: Quick Care performs a quick-fire scan of five key areas of your computer: malware, Registry, shortcuts, privacy sweeper and junk files. If you want to go further, select Deep Care instead – this performs the same five scans as Quick Care, albeit going deeper (so you get a full malware scan and deep Registry clean), plus adds another five for good measure.

This free version contains all the basic functionality you need – if you want to push things even further, try the paid-for Pro version instead which includes deeper scanning, automatic optimisation and access to 10 different user interface themes.. Once you’ve upgraded, just enter the license key to unlock the program’s full range of features. You can download free version of Advanced SystemCare by click this download link 

AdvancedSystemCare 4 Pro
For Advanced SystemCare 4 Pro you must buy this license about $19.95. But you can get and Download Advanced SystemCare 4 Pro for free by visit this page http://www.downloadcrew.co.uk/article/21777-iobit_advanced_systemcare_4 Just Download this software and then use serial code to turn Advanced SystemCare 4 in to the PRO version. Hurry up ..!!. This full version download offer is available through to December 31 2011.
Special thanks to DownloadCrew for shared Advanced SystemCare 4 Pro

Download CCleaner 3.13

CCleaner is is one of most software that must you have to increase performance your computer. CCleaner will remove the junk files, temporary files, history your browsing internet, cookies, recent documents, empty recycle bin, clipboard, memory dumps, windows log files, chkdsk file fragments. Thus your computer will be increase free space of harddisk drive and then your computer will running faster.

ccleaner
Besides of feature above, CCleaner also have a registry cleaner and tools like uninstall program, setting start up, system restore and drive wiper. With this software, user can do easily to maintenance computer.

The latest CCleaner 3.13 ships with these new/improved features:
  • Added IE addon manager.
  • Added Firefox Jumplist Cache cleaning.
  • Improved Firefox and Thunderbird cache cleaning.
  • Improved Google Chrome Internet History cleaning for typed URLs.
  • Improved Google Chrome Canary Saved Form Information cleaning.
  • Improved Google Chrome Canary Saved Passwords cleaning.
  • Improved Recycle Bin cleaning with symbolic links.
  • Improved item exclusion feedback in Registry screen.
  • Improved keyboard usability on Intelligent Cookie scan dialog.
  • Added support for custom Thunderbird installation.
  • e.g. CustomLocation1=THUNDERBIRD|C:\Portable\Thunderbird\Data\profile
  • Added cleaning for Corel PaintShop Pro X4, Nero Video 11 and Nero Vision 10.
  • Improved cleaning for WinRAR, LogMeIn, Office 2003, 2007 and 2010.
  • Added Indonesian translation.
If you want to trying or use this product, you can download it at this link bellow :

How to install font in windows 7

Some times when you get a job to make artistic teks, you can make it with artistic teks program like Ms Word, Adobe Photoshop, Corel Draw, etc. At doing this job we need some artistic fonts that installed at the computer. This artistic fonts can make your job safely a time. When you installing windows 7, the standart font will be automatic installed to the computer. But another artistic font not yet installed. You may install new font by your self.

Trick to install font to the computer in Windows 7 can be follow this steps :
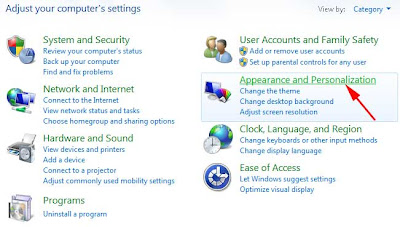
  1. Open Control Panel > Appearance and Personalization, > Fonts.
  2. Click File, and then click Install New Font.
    If you don’t see the File menu, press ALT.
  3. In the Add Fonts dialog box, under Drives, click the drive where the font that you want to install is located.
  4. Double-click the folder containing the fonts that you want to add.
  5. Under List of fonts, click the font that you want to add, and then click Install.

Restore default font in windows 7

Because your activity at your computer, like installed many program or softwares and new fonts or cause anothers activity, your windows now not use default fonts again. This situation become of you not familiar with display fonts in windows. If you want to restore default font in windows 7, you can follow this tricks below :
  1. Open the control panel and then select Appearance and Personalization

    default font settings
  2. At Fonts point, select Fonts setting

    default font settings
  3. Click at Restore default font settings

    default font settings 
  4. Now, your windows will be use default font again

How to resize icon on the desktop windows 7

For some user, display desktop is very important. they are like wallpaper about their collections photos. size of icons on the desktop are become one of the the consideration for user. Some of user like a small icons and the others like larger one.

Resize icon on the desktop windows 7 for larger or smaller can be do it with a simply trick,  press Ctrl + Mouse scroll wheel. thats it, you will see your icons on the desktop be smaller or larger.

resize icon desktop windows 7

How to disable autoplay on usb flashdisk

autoplay flashdisk

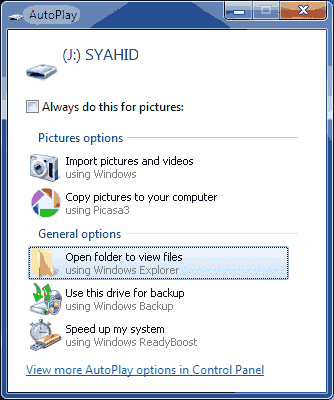
When usb flashdisk or cd, DVD are installed at computer or laptop usually will be expand this drive at windows explorer or another programs. This setting called autoplay. Autoplay make user easily to open their file without expand at windows explorer first. however, autoplay can potentially computer from viruses like trojan, worm, etc. If You want to disable autoplay for CD and pendrive or DVD, You can follow the steps below :
  1. Click start and type gpedit.msc then press enter

    open gpedit
  2. Choose computer configuration/administrative templates/all settings
  3. On the right pane scrool down and double clicks turn off autoplay.

    disable autorun flashdisk
  4. Set to enable. At the option turn off autoplay on, choose all drives and then click apply and OK

    disable autoplay flashdisk 
  5. Do it the same steps on User configuration
Now if you want to open your flashdisk or CD and DVD on computer, you must open that drive with windows explorer and before you expand that pendrive, you should to scan first with antivirus.

Get free Avira Antivirus Premium 2012 with activation code

Avira antivir premium 2012 free 

Avira Antivirus is one of more best antivirus. Avira antivirus available of free avira antivirus and avira antivirus premium. Avira antivirus premium provides better protection that the avira free. For get a avira antivirus premium 2012, you can buy that software at home page here

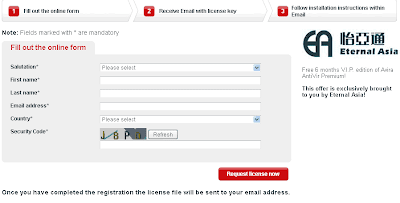
But now you can get Avira Antivirus Premium 2012 promo for free 6 months by following this steps :
  1. Open promo page of Avira Antivir Premium 2012 activation code here : Avira Antivir Premium 2012 promo page 

    Request Avira antivir premium 2012 free 
  2. You will receive email from Avira that contain confirmation link for the activation code and download link Avira Antivir Premium 2012
License code from this promo is not to for comercial uses. This license code is free for personal uses. You can download Avira Antivirus Premium 2012 here : http://www.avira.com/premium-download . This license code active for 6 mounth, and if promo ended you can buy Avira Antivir Premium 2012

Freedownload TweakNow Power Pack 2011

TweakNow PowerPack is a free software that used to tweak computer’s operating system and web browser. Although a free but this software is powerfull to fine tune your computer. There are many usefull utilities to optimizer your computer. Available many features in this program, The Registry Cleaner module provides you with a safe and simple way to clean Windows Registry, For Windows tweaking lovers, the suite provides more than 100 hidden Windows settings in the Windows Secret section, customize your windows, troubleshooting, view detail information about computer (operating system, memory, harddisk, processor, motherboard, etc) and many more. With this software, you can easily make computer  to run faster and customize configuration your desktop. TweakNow PowerPack is compatible with Windows XP/Vista/Windows7.

freedownload software tweak windows

If you want to get this software, you can download at this link below.

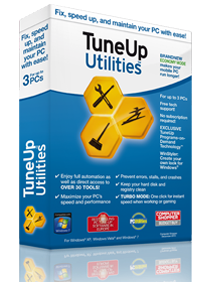
Download TuneUp Utilities 2012

TuneUp Utilities is a software that can improve the performance of your PC, pC become safer and more comfortable. The latest version of TuneUp Utilities is TuneUp Utilities 2012. There is the addition of new features that progran tuneup Deactivator and economic mode that can extend the duration of use of your laptop battery life. Features of TuneUp Utilities Start Center and Settings Center is the other new features

Some features of TuneUp Utilities 2012 is :
  1. Tune Up economy mode, TuneUp Economy Mode improves battery life by up to 30% and is nothing short of an energy-saving miracle.
  2. Tuneup program deactivator, Program Deactivator restores over 50% of speed and free space on bogged-down PCs
  3. Turbo Mode, Turbo Mode shuts down all non-essential Windows® services such as Media Player sharing, pen recognition, or remote assistance processes to give you the fastest PC performance possible.
  4. TuneUp Live Optimization, Live Optimization delivers on all counts with technology that works silently in the background and improves the prioritization process of all running applications. A nifty algorithm observes the computer’s total usage in real time, allowing it to balance resources more effectively. Programs start faster and application performance speeds increase – even if other processes are trying to slow your PC down.
  5. Disable startup programs, detects and helps you eliminate unwanted startup programs that use up resources and slow things down to a crawl.
  6. Accelerate system startup and shutdown, StartUp Optimizer jump starts your PC by identifying unnecessary startup programs and services, as well as incorrect system settings.
  7. Defragment hard disk, TuneUp Drive Defrag restores perfect order to your hard drive while speeding up file access, boot times, and program launches.
  8. Clean Windows® with a Single Click, TuneUp Utilities™ 2012’s maintenance feature eliminates system-hogging data clutter and prevents the typical “Windows slowdown” effect
  9. Clean hard disk, TuneUp Utilities™ deletes all kinds of junk data that is automatically left over by Windows.
  10. Uninstall unneeded programs, TuneUp Uninstall Manager helps identify those programs that are rarely used or never used at all. Such programs are removed quickly and easily, freeing up numerous gigabytes of disk space.
  11. Defragment, Clean and Edit the Registry, Over the course of a computer’s lifetime, hundreds of entries (“values” and “keys”) are written to the registry database only to be removed once again. That happens thousands of times daily and leads to values and keys referring to files, file types, applications, folders, or startup programs that  no longer  exist. The result: huge errors in Windows®, not to mention debilitating system crashes. TuneUp Registry Cleaner solves all these problems by detecting and fixing registry errors
  12. Find and Delete Large Amounts of Data, TuneUp Disk Space Explorer analyzes both internal and external hard drives and returns a graphical overview detailing what type of data is taking up the most disk space. It also identifies your PC’s top 10 resource hogs, and shows which of your folders contain the most data
  13. Remove Broken Shortcuts, TuneUp Shortcut Cleaner turns chaos into order by removing unnecessary shortcuts on your desktop, in your start menu, and in “recently used” lists like songs played in Media Player or documents in Microsoft Office that were deleted a long time ago
  14. Restore deleted files, TuneUp Undelete restores all your accidentally or mysteriously deleted files and folders, including those that were deleted from the Recycle Bin and even previously deleted images from your digital camera's memory card.
  15. You can easily browse all your deleted data or search for one specific file and rescue them from oblivion, assuming Windows® hasn’t overwritten the disk space that was previously occupied by them.
  16. Clean hard disk, All versions of Windows®, as well as several 3rd party programs, leave behind traces and temporary files which consume precious disk space and even contain personal information. With the “Unnecessary files”  feature of TuneUp Utilities™ 2012, you don’t just delete these reports, but  a ton of unnecessary data clutter as well
  17. Delete files safely, Simply deleting a file doesn’t necessarily mean it’s deleted. Even formatting a drive doesn’t actually destroy all those bits and bytes. In both cases, the file system simply deletes the internal “shortcuts” to such files and leaves the actual data on disk -  at least until it gets overwritten by new data. Which means anyone with basic recovery tools and access to your PC is able to restore such files.
  18. Analyze and troubleshoot your PC
  19. Personalize Windows
  20. And More Great Features
If you like to use this product, you can download at the link below

FREEDOWNLOAD WINDOWS 7 THEMES

For you who like to change the display of windows 7, surely it would be more easily done by changing theme of windows 7. By changing theme of windows 7, then the display of wallpaper also changed other display. Just by opening that theme, display  personalization of windows 7 has changed to be more beautiful and antique.


You can get the theme windows 7 for free at url below :

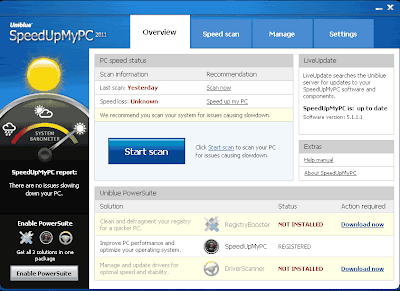
Download speedupmypc 2011 full version with serial


Speedupmypc is software or programs that can increase computer performance. Slow down computer performance is a problem that many users complained. SpeedUpMyPC 2011 may be one solution to overcome the problems of computer performance. Only with one click, the program will run to increase capability and performance of your computer.
To get this software full version, follow these steps:
  1. Visit http://mag.uniblue.com/pcadv/sp/
  2. Click Get Your FREE Product
  3. Complete the registration form with your details and click the Complete Registration

  4. You will receive an email containing the download link and serial code SpeedUpMyPC 2011.

  5. Download the software, run and enter the serial code that you have obtained.
  6. SpeedUpMyPC you are already a Full version.

How to delete user accounts in Windows 7

Computers are used by many users, should be made ​​user accounts for each one. Therefore will make it easier to manage the files and settings for each user. However, if the user is no longer use their accounts, it should be recommended to the user account is deleted. To delete a user account on Windows 7, the following steps:
  1. Click Start and then type "user accounts" and press enter
  2. Click Manage another account
  3. Select the user account you want to delete
  4. Delete the account
  5. Choose one, delete files or keep files
  6. Delete account
From now on, the user account is deleted

How to use System Restore in Windows 7

System Restore is a feature that very useful to restore the computer system at some previous time. By using system restore, in some instances, you can eliminate the virus in the system. To use the system restore can be done such as following steps:
  1. Click Start and then type system restore and then press enter
  2. You will see a screen restore system files and settings. Click next
  3. Will be seen there a list of restore points and the date when the restore point is created.
  4.  Select one restore point and then click next.
  5. You will have confirmation, and then click Finish
  6. Restart computer
If successful, then your system will return to the previous time. If not successful, you should doing a restore on safe mode.

How To Install Windows 7 step by step

  1. Insert your Windows 7 DVD into dvd rom and boot your computer from DVD Rom.
  2. Now load the setup files.
  3. Select your language to install, time & currency format, keyboard or input method and then click Next.
  4. Click Install now.
  5. Check I accept the license terms and then click Next.
  6. Click Custom (advanced) or Click Upgrade if you already have a previous Windows version
  7. Select the drive where you want to install Windows 7 and click Next.
  8. Installing Windows 7 will start.
    • Copying Windows files
    • Expanding Windows files
    • Installing features.
    • Installing updates
  9. After that it will automatically restart after 15 seconds or click restart now and continue the setup
  10. After restarting, it will continue the setup. This step will take the most time than the previous steps.
  11. Your computer will restart again and continue the setup.
  12. Type your desired user name in the text-box and click Next. It will automatically fill up the computer name.
  13. If you want to set a password, type it in the text-boxes. If you don’t, leave it Type your product key in the text-box and click Next. You can also skip this step and simply click Next if you want to type the product key later. Windows will run only for 30 days.
  14. Select your desired option for Windows Updates.
  15. Select your time and click Next.
  16. If you are connected to any network, it will ask you to set the network’s location.
  17. And now you have a fresh copy of Windows 7 installed on your computer

Run XP Mode on Windows 7 Machines Without Hardware Virtualization

One of the neatest new features in Windows 7 Professional and above is XP Mode, but not all machines are capable of running it. Today we show you how to use VMware to run XP Mode on machines without Hardware Virtualization.
How does this work?
Even if your computer doesn’t have hardware virtualization, you can still install XP Mode but just cannot run it as you can’t run Virtual PC.  Enter VMware Player.  This free program lets you create and run virtual machines, whether or not you have hardware virtualization.  And, it can directly import XP Mode so you can use that copy of XP for free.  A couple features are different, but it’s still a great replacement since you otherwise couldn’t use it at all.
Note: XP Mode does not work on Home Versions of Windows 7 and you’ll need VMware Player 3.0
Getting Started
First, download and install XP Mode (link below).  There is no need to download Virtual PC if your computer cannot run it, so just download the XP Mode from the link on the left.
sshot-80
Install XP mode; just follow the default prompts as usual.
 sshot-81
Now, download and install VMware player.  The download is free, but requires registration.
sshot-79
You may see some prompts about installing drivers; simply approve them.  We didn’t see them on our latest test, but have in the past.  When you are finished installing VMware Player, you will have to restart your computer.
sshot-2010-02-16-[19-14-34]
Add XP Mode to VMware Player
Now that your computer is rebooted, run VMware Player.  We can import XP Mode by clicking File, then click “Import Windows XP Mode VM.”
sshot-38
VMware Player will simply start importing your XP Mode.  Converting XP mode to VMware format may take a couple minutes depending on your hardware, so just be patient.
sshot-41
When this is done, you should see a new virtual machine in VMware Player called XP Mode!  Click “Play Virtual Machine” to run XP Mode.
sshot-37
XP will run through it’s first-run setup process.
sshot-43
While it is loading, you may be prompted to install or update VMware Tools.  This is required to integrate XP Mode into your computer, so click Update Tools or Install Tools depending on you situation.
sshot-47
The tools will automatically download and install, though you may have to approve an UAC prompt.
sshot-51
Now you can proceed with your XP setup.  Accept the license agreement,
sshot-55
Choose your locale and keyboard settings
sshot-57
Enter a name for the virtual machine and an administrative password
sshot-58
And enter the correct date, time, and timezone.  It usually gets the correct time and date from your computer itself, but the time zone is often incorrect.
sshot-59
XP will now finalize your changes, and then reboot.
sshot-61
When XP Mode restarts, choose your settings for updates.
 sshot-63
Windows may ask to search for drivers.  Simply press cancel, as VMware Tools will contain everything we need.
sshot-62
After a short delay, you should see your XP desktop in VMware Player!
sshot-65
There’s one last thing that needs to be installed – VMware Tools.  This should automatically open in XP Mode; if not, click Start, then My Computer, and finally double-click on the CD drive which should say VMware Tools.
sshot-2010-02-16-[20-02-36]
Now, simply run the Tools installer with the Typical setup type, and reboot the XP Mode when it’s finished.
sshot-67
Now VMWare is setup and we’re ready to start integrating it with Windows 7.
sshot-2010-02-16-[20-08-50]
Integrate XP Mode in VMware Player with Windows 7
The real advantage of the default XP Mode in Windows 7 is that the XP programs are fully integrated with their Windows 7 counterparts.  You can run them seamlessly with other programs, copy between them, and even open and save files to the same folders.
Let’s set this up in VMware.  Copy and paste from Windows 7 to XP Mode in VMware is activated by default.  To use your XP programs seamlessly with Windows 7, click VM on the top of the VMware window, and click “Enter Unity.”
sshot-74
You can easily access any program or file in XP mode through a dedicated XP Mode Start Menu.  When you hover over your Windows 7 Start button, a new button called “Windows XP Mode” will above it.  Click there to access a full start menu from XP Mode right in Windows 7.
sshot-78
Here is an IE 6 window from XP running side-by-side with IE 8 in Windows 7, thanks to VMware Player!
sshot-77
By default, the virtualized windows will have a border and the VMware logo on their edge.
sshot-2010-02-16-[20-21-39]
To remove this logo, click VM in the VMware player window, then settings.  Click on the Options tab, and choose Unity on the left.  Now uncheck the boxes that say “Show borders” and “Show badges.”
sshot-76
Without having the VMWare borders and badges give everything a more authentic XP Mode look and feel.
sshot-2010-02-16-[20-23-15]
You can even use removable devices, such as flash drives, in XP Mode in VMware Player.  Whenever you connect a new device to your computer, VMware will remind you that you can add it to XP Mode.
sshot-82
Simply click VM, then Removable Devices.  Select your device name, and click Connect.
sshot-86
Save Files in XP Mode to My Documents in Windows 7
By default, files created in XP Mode in VMware Player will be saved inside the virtual machine.  It’s more convenient if they’re saved directly to the My Documents folder in Windows 7, so let’s change this.  Click VM, then Settings.  Click the Options tab, and then choose Shared Folders on the left.  Now click the bullet for “Always enabled” and check the box for “Map as a network drive in Windows guests.”
sshot-85
Now click Add at the bottom of that window.  This will let us add a shared folder.
sshot-87
Let’s add the My Documents folder from Windows 7.  Click Browse, and then select your My Documents folder.  Click Ok, and then click Next.
sshot-90
Make sure the box is checked that says “Enable this share” and then click Finish.  You can now close the settings window as well.
sshot-91
Back in XP Mode, click Start, then right click on My Documents, and select Properties.
sshot-4
Click Move to find the new My Documents folder.
  sshot-14
Find the folder we just shared from Windows 7 by clicking My Computer, then the drive that says “Shared Folders on ‘vmware-host’” or something similar.  Now select the folder we shared, Documents, and click Ok.
sshot-15
Click Ok in the main properties window.  It may offer to copy the files from your old My Documents folder to the new one; choose Yes to make sure you have all of your documents in Windows 7.
sshot-11
Now, whenever you go to save a file in XP Mode, it will automatically save in your My Documents folder on Windows 7.  You can repeat the same process for any folder you wish, such as your My Pictures and My Music folders.
Conclusion
That’s all … now you have your full XP Mode running on your computer without hardware virtualization.  Almost all the same features are there; the only thing you’re missing is the Start Menu integration, but VMware’s menu is the next best thing. In our tests using VMware worked as good or better as actual XP Mode on a machine that supports hardware virtualization. If you’re frustrated that the Windows 7 machine(s) you have don’t support XP Mode, using our VMware method works, and allows you to use it on whatever machine you want.
You might also want to check out our look at XP Mode in Windows 7 if your machine is capable of running it. To find out if your machine can run XP Mode the best tool we have used is Securable which is linked below.
Links
Download Windows XP Mode
Download VMware Player 3
Download Securable to Test if your Machine Can Run XP Mode.

Source : http://www.howtogeek.com/howto/10911/run-xp-mode-on-windows-7-machines-without-hardware-virtualization/

 
Powered by Blogger | Printable Coupons